Macro Photography

  • Most camera manufactures sell Macro lens which allow photographers to expand the image to greater than 1:1. these lens’ are quite expensive, alternatively learners can use the camera in macro mode if available (this may not be as effective as a dedicated lens).
  • Use point of focus OR manual focus
  • Use A TRIPOD to frame the object and background, apply compositional rules where possible.
  • Experiment with depth of field, you will be very close to your subject which results in a sudden drop off on focus, to overcome this you might want to maximize your depth of field therefore shoot at f 16 f22. In other circumstances you may like the drop off in focus in which case use a lower f stop e.g. 4.0
  • Work with a low/medium ISO from 100 to 400
  • Apply manual exposure and the exposure meter to ensure that the subject is adequately exposed.
  • In some case you may choose to use flash light

A macro photograph is one in which the size of the subject on the negative or image sensor is life size or greater, although most of the time we will end up looking at a large size image of a really small insect or flower, for example

Image bank

My images

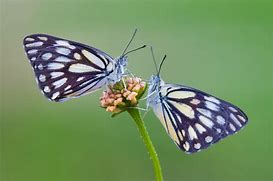
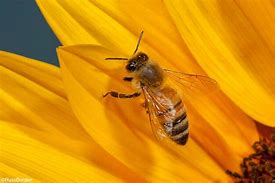
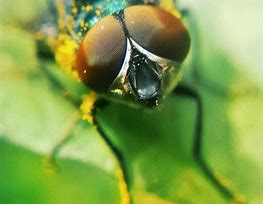
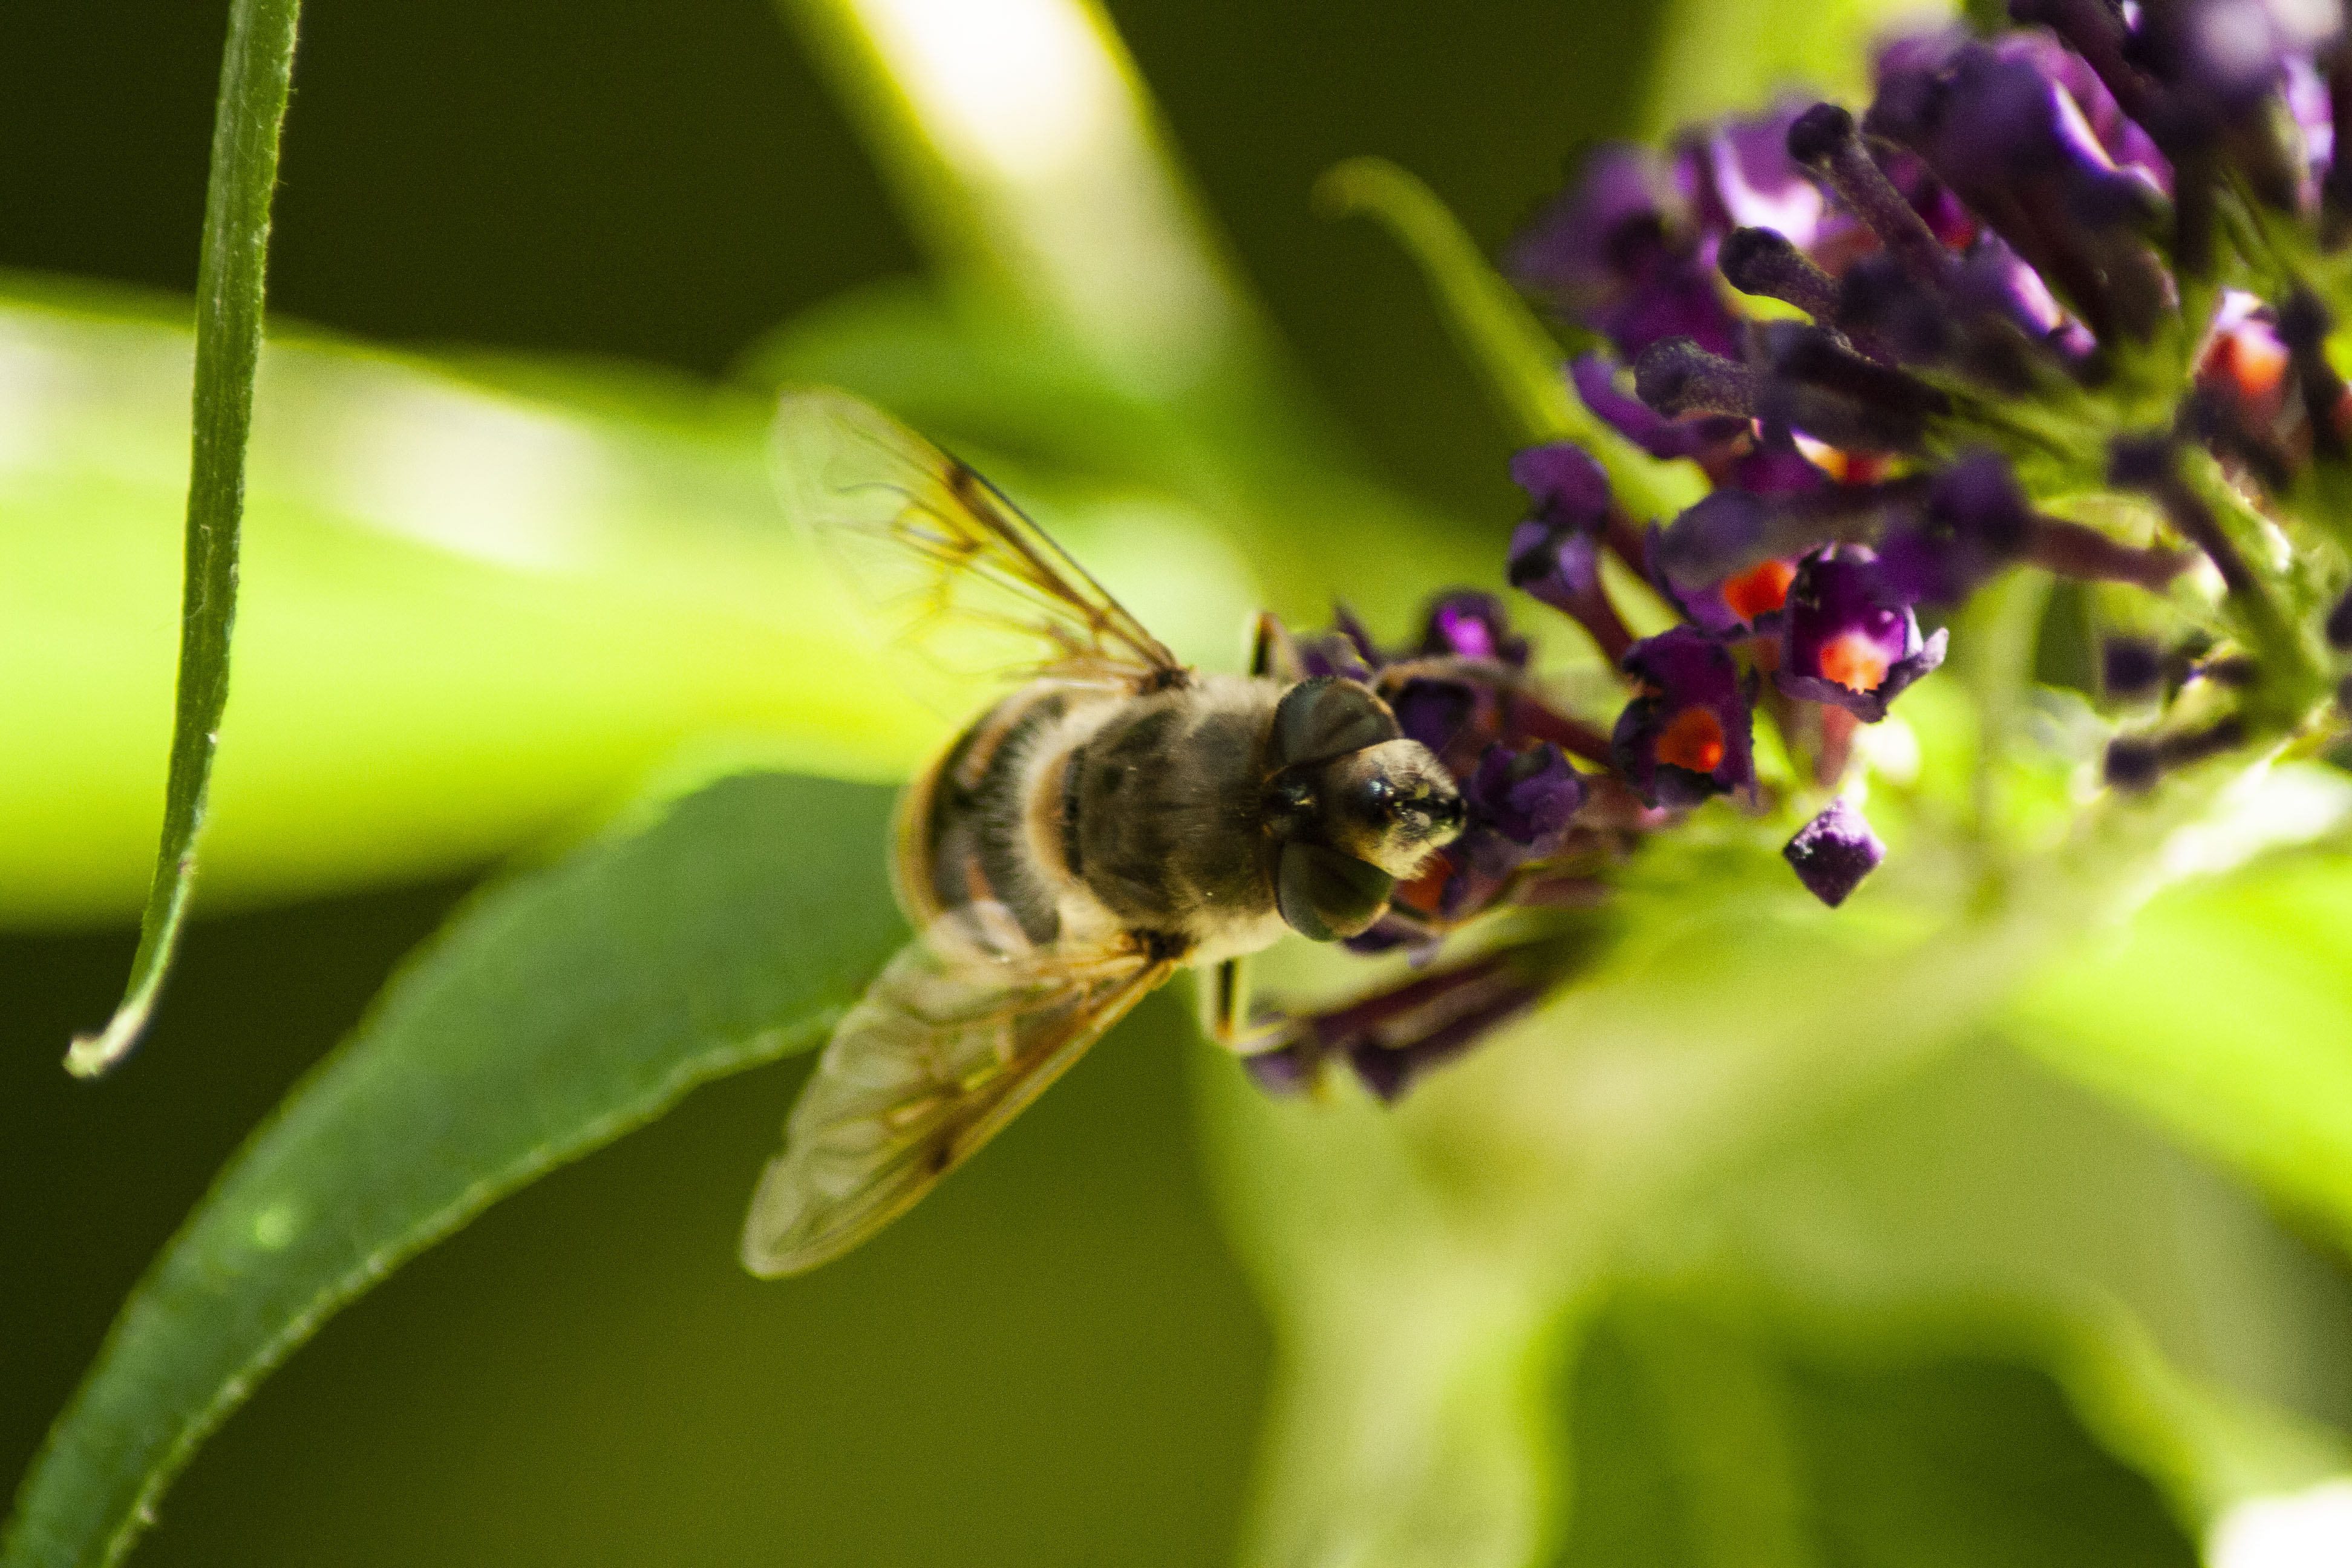
In the following images, I have used a macro lens – Tameron 70-300mm. This lens allowed me to get closer to wildlife such as hoverflies, butterflies and bees and capture the finer details like their wings which with a standard lens would not have been possible. All of my images are shot in Raw format and have all been edited in photoshop.

Canon EOS 1000D, F/5.6, ISO – 400, 1/400, Focal length – 300mmm

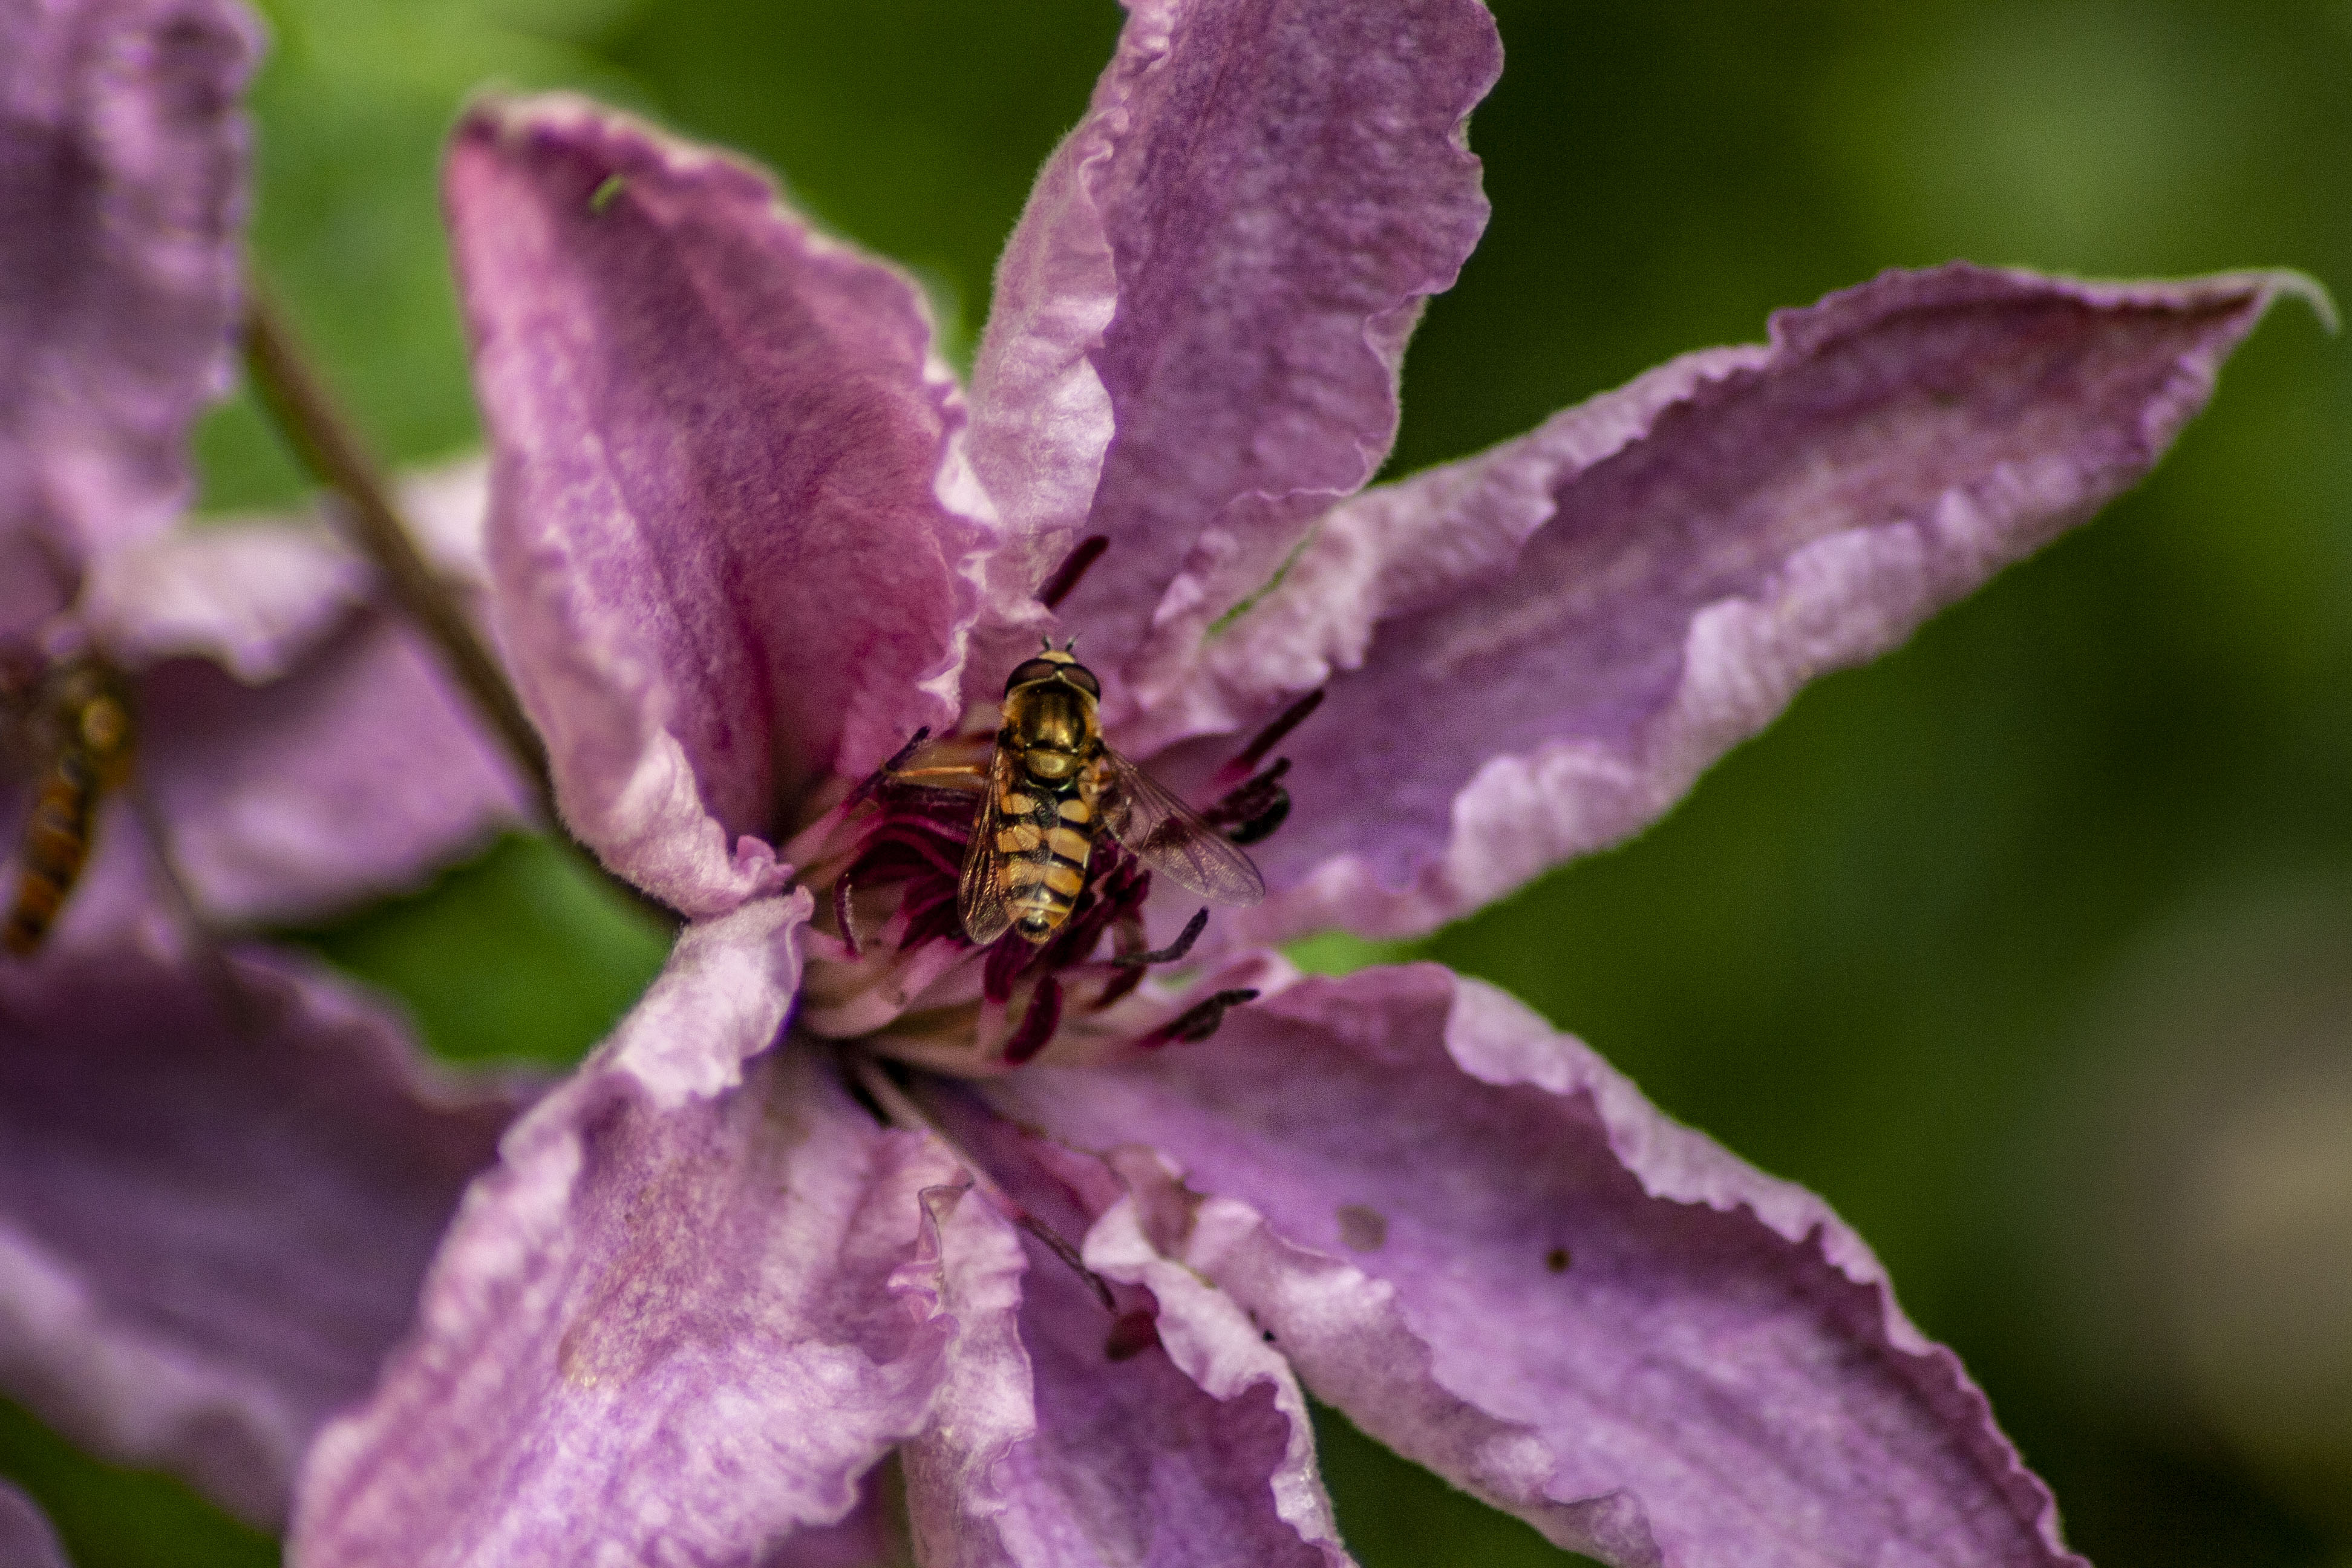
In the photograph above, I like the contrast between the strong yellow and black colouring of the hoverfly and the soft pink of the flower in which it is sat upon. The macro lens allowed me to capture the intricate details of the wings. I edited this image in Photoshop, increasing the contrast and the clarity of the image, which gives a crisp look to the image. I played around with the curves also, in order to really bring out the colourful summer flower.

Canon EOS 1000D, F/5.6, ISO 400, 1/1250, Focal length – 300mm

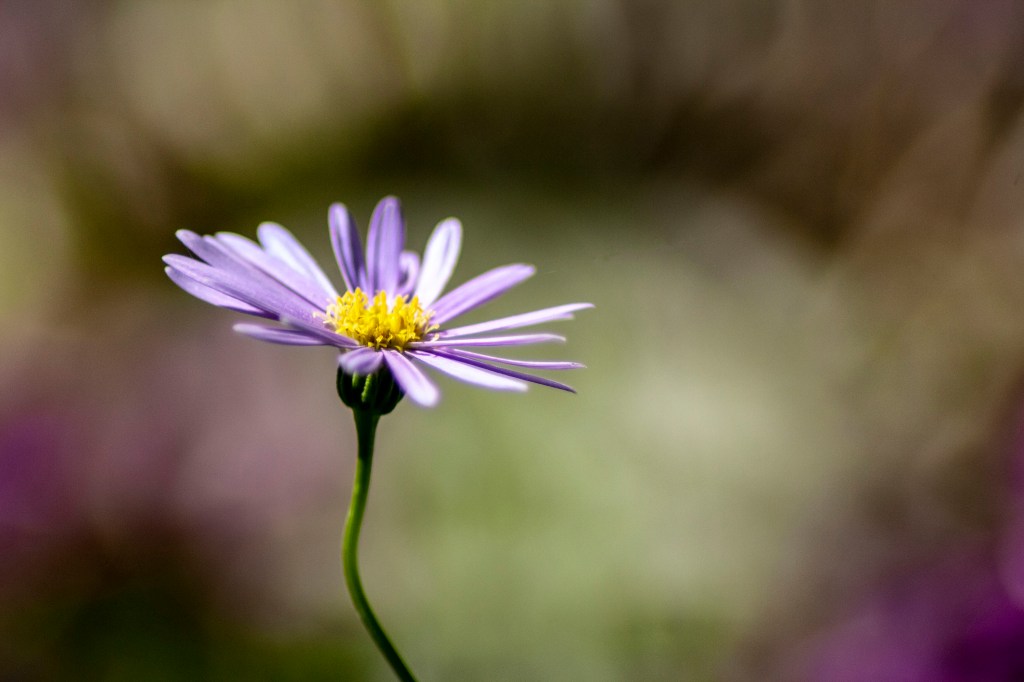
In this image, I think that less is more. The individual flower, with the pollen in focus shows vulnerability and beauty at the same time. In photoshop, I also used the blur tool to bring focus to the flower and used the sharpen tool.

Canon EOS 1000D, F/5.6, 1/1000, ISO 600
Canon EOS 1000D, F/5.6, 1/400, Focal length 300mm
Canon EOS 1000D, F/5.6, 1/250, ISO-400, Focal length 300mm

Personally, I think that the visual outcome of my images are good, I have been playing around with my macro lens for a while and I feel that my images are getting better and better with each shoot which means that these images did come out the way I wanted.

Progression – I would like to continue using this technique within my personal investigation. i would also like to refine my work by reducing the saturation on my images in future.

Wide Angle and Telephoto photography

       RECORD THE TELEPHOTO SETTINGS

       Make a note as to whether you have observed distortion effects at small focal lengths (wide angle) compared to long focal lengths (telephoto)

       Whilst the wide angle lens should generally be avoided for portraiture because of the distortion effects, it can be used in certain instances in a creative way.

    The higher the telephoto setting the shallower the depth of field… you may notice this when photographing close up using a telephoto setting of e.g. 100 mm

Focal Length       Lens TypeCommon Subjects     
       8mm – 24mm      Ultra wide angle (fisheye)      Wide panoramas and skyscapes, artistic
       24mm – 35mm      Wide angle      Interiors, architecture, landscapes
      35mm – 85mm (50mm common)             Standard      General purpose
      85mm – 135mm      Short telephoto      Portraits, candid
      135mm – 300mm      Medium telephoto      Close sports, action
      300mm+      Super telephoto      Far sports, wildlife, nature, astronomy
Image result for telephoto wild life photography birds
Here is an example of telephoto photography.

All of these images are taken using a wide lens. I will be experiementing with this over a couple of shoots to see whether i would like to continue to use this in my own work.

My images

The following images were taken with a zoom lens, 70-300mm white a field of silage was being harvested.

Canon EOS 1000D, F/5.6, 1/2000, ISO-400, Focal length 55mm
Canon EOS 1000D, F/11, 1/400, ISO-200, Focal length 53mm
Canon EOS 1000D, F/4.5, 1/3200, ISO-200, Focal length 33mm

The above images were all shot in raw format. this means that in Photoshop I can control more adjustments made to the final image. in the above images, I adjusted the Contrast, Highlights and Darkening settings, then used tools such as curves and dodging and burning to help create the final images. However, with photographs like the bird, this required me to adapt my settings at the time of the shoot (on my camera) in order for the bird to be seen against the bright blue sky.

Canon EOS 1000D, F/5.6, 1/4000, ISO-1600, Focal length 28mm

This image was also taken with the lens that I used in the first images, however, the light at the time of the shoot was not in my favour, so the images have not come out how I would have ideally liked, However, I still decided to edit the images in photoshop to see if there was anyway that I could adjust them in order to create a better image, and these are the results

Personally, I think that my final images are good, and they have come out as I had expected them to.

Progression – I would like to continue studying this method of photography as I feel like I could easily improve on my images with some practise.

Animated GIF

How to create an animated GIF

Animated gif’s can be created from still images.

To do this you WILL need to RESIZE YOUR IMAGES TO AN APPROPRIATE SIZE AND RESOLUTION FOR THE WEB…

For example 72 dpi, and 900 x 600 pixels, You can do this by selecting Image, Image size and set the dimensions above whilst selecting the Re sample option.

Load your images that you want to create an animation with.   Import the images into the Photoshop file and organise the layers as the sequence that you want to animate. Layer 1, 2, 3, etc.

·         Select Widow, Timeline,

·         Select Create video time line

·         Drag the images into the time line and adjust each clip duration to e.g. 5 frames

·         Order the images in the sequence that you want to show.

·         To test the animated gif you need to press the play button

·         To loop the video you will need to select the “set the playback options button” and then press play.

·         To save the animation you need to select File, Save for web.

At this point you need to ensure the animation is looped see the image below and that you have selected a gif  file option and 128 dithered

My image

To take the images made in this GIF, I used a tripod, to make sure that the camera was kept still, reducing the risk of shake, and to make sure that the only movement in this specific GIF was the horse. I also used a fast shutter speed in order to capture these images, without movement blur.

To edit these images, I used photoshop, adjusting the colour balance, and the highlights.

I would like to keep exploring this technique before I decide whether or not I would like to use this in my work as I’m not sure if it would suit my style of photography.

Sequencing Techniques

In this work diary I hope to explore the methods of sequencing techniques within my work, exploring what difficulties I may face when shooting and editing these sorts of images.

Image bank

For this technique I used the following settings –

  • manual settings (fixed exposure)
  • manual focus
  • a tripod – to minimise camera shake
  • directed the shoot
  • fast shutter speed

My Images

In the image above, I used Photoshop to create this sequence. I think that the image has turned out well, considering I am new to this technique.

I don’t think that this image (above) is as good as the first, I think that I need to do some refining if I were to use this as a final image.

I think that although I am happy with the outcome of this image, and am willing to try again and improve on mhy techniques, I dont think that I will be incorporating this into my work.

Video footage

In this work diary, I hope to explore the methods of Videoing within my work, exploring the difficulties that I may face when shooting the footage and editing them. When I am experimenting with capturing video footage, I would also like to explore the use of time-lapse within my work.

In order to capture video footage or time-lapse I would need to ensure that the camera is kept steady, to avoid shaking of the camera which will result in poor quality footage being produced. If I was shooting a time-lapse in particular, i would require a tripod to ensure that there is no movement of the camera lens. However, if I were to shoot ‘walk through’ footage, I may need to look at stabilisers which would also ensure that I am capturing the most steady footage possible.

In regards to camera settings, I would need to have a slower shutter speed such as 1/30 or 1/60 (a frame rate of around 25 FPS) which would give the most natural motion blur.

an F-stop of f-8 would give a higher aperture, allowing less light through the lens thus creating a wider depth of field that if a lower f-stop such as 1.8 was used.

When reviewing the ISO that I would use, a higher ISO would increase the chance of noise or grain entering the footage. Due to this, I will be aiming to look at using an ISO of 100-400 which will hopefully produce a better quality of footage compared to an ISO of 1600 and above.

Design a site like this with WordPress.com
Get started