Wildlife photography

Image result for eos 1000d canon
This is the camera that I have taken all of my photographs on, the Canon EOS 1000D
Image result for macro lens canon 70-300mm
this is my Macro lens, a 70-300mm zoom. it has the option of a telephoto or zoom lens as well as the choice of manual or automatic focus. within my photography, I prefer to have control over the focus so I choose to have it is manual permanently. For more information on Macro photography, please see the My Macro Photography post
Image result for tripod
This is the tripod that I use in order to stabilise my camera on all shoots. It is foldable making it easy to carry around with me at different locations.

When conducting wildlife photography, it is important that that you know the equipment that you are working with. It is important to know what camera settings are required for the wanted outcomes because you could risk missing the shot or messing up the images you do get. For example, it is vital to know what shutter speeds will allow you to obtain sharp images with the camera/ lens combination that you have. You must be able to move quickly between different focus points or focus modes such as manual or auto focus.

Wildebeest_Dune.jpg

It is also important to know the subject, as it can pay to be able to predict your subject’s behaviour beforehand. Knowing your subject can make the difference between being ready and prepared for capturing that “golden moment” which then leads on to the decisive moment. With wild life photography, it is important to spend time with the subject, not just a fly by visit, but watch and observe them, and only this way, will the most impressive images be produced.

Roller_Lunch.jpg

Proper composition is also vital within Wildlife photography, usually it is the rule of thirds that is used and when incorporated in your technique enable you to instantly capture that fleeting moment properly. However, abstract compositional arrangements can really bring a photo to life.

Buffalo_Abstract.jpg

As well as composition, lighting is also important in any type of photography to produce a good image however, in wildlife photography, often, the light isn’t ideal; the light is good but from the wrong direction and it isn’t always possible to move around to a better spot due to the flight instinct of most animals. However, wildlife photography has taught me especially, that even if the light is not ideal, it can still add a lot of mood to an image.

Image result for professional wildlife photography

The level at which the image was taken can also greatly effect the look of the image. if the photograph is taken from a level perspective, it brings the viewers into the scene, bringing them into the subjects world. However, before doing this, you must bear in mind the constraints of the environment and is massively dependant on the subject that is being photographed.

Image result for professional wildlife photography

Depth of field is controlled by multiple things such as aperture, focal length and distance to the subject. Within wildlife photography it is important to ensure that there is enough depth of field that the entire subject is in sharp focus, making the background soft and distraction free to ensure that the focus really is on the subject and that it stands out.

Image result for professional wildlife photography

Investigation into the changing of the seasons in the British countryside

Introduction

The changing of the seasons happens, little by little, every day of every year. With every season something new is brought, in spring, new buds are formed. In autumn, the leaves that reached their peak in the summer, fall. The crops that spent a year growing, are harvested within a day. It is something that usually goes unnoticed and is often unappreciated. Personally, by capturing the smallest of changes, the different plants, the changes of the wildlife, it helps to display the landscapes true beauty, in a form that is in its most natural, that is so commonly overlooked in a world where everybody is rushing to the next thing on their never ending lists.

In this essay, I aim to highlight the reasons why I have selected landscape and nature photography as my illustrated project and the origin of the photography itself. I am interested in pursuing landscape photography within my investigation as I enjoy being outdoors. I want to explore different locations and their contents. I would like to capture images that show the presence of nature, which is often overlooked, whilst looking at the disturbances of these landscapes.

Brief history

Landscape photography dates to 1826 / 1827, however it is difficult to trace the exact origin of the very first photograph. Before cameras, paintings were the only source of landscape pictures. The first image recorded of an urban landscape was taken by a French inventor Nicéphore Niépce. This image couldn’t be reproduced. For the image to be taken in the first place, the camera must have been in a place where it could sit for eight hours whilst the exposure could finish. [i]

Figure 1

Landscape photography first became most popular during the Victorian era; however, it was an artist Edward Steichen in 1904 whose photograph, taken in New York, gained landscape photography recognition in the art world. The image, The Pond – Moonlight, is a photograph featuring the reflection of a forest in the pond’s water with the top of the moon peaking over the ridge through a gap in the trees. The final prints were created by manually applying light sensitive gums, a process based on the light sensitivity of dichromate’s and is a multi-layered printing process used in the 19th century. Any colour can be used for this type of printing, so natural-colour photographs are also possible. [ii]

Figure 2

Also, within the 19th century lived the very well-known landscape photographer, Ansel Adams. An extremely avid explorer, he dedicated his life to photography. Helping found the Group F/64, an association of photographers advocating photography that favoured sharp focus and the use of the full tonal range of a photograph. [iii] Some photographers that where a part of the Group F/64 included Imogen Cunningham and Edward Weston. He was able to use the camera with extreme care and passion, but also mastered the developing of the negative and printing the final image. His images contain a high level of definition which amazed many people and continues to do so. The photographs that were taken within the 19th century was recorded using large format plate cameras on tripods. These constrained the photographer to work from a limited viewpoint.

Figure 3

The cameras that are in use today are much different than those used in the 18th century. In recent years, digital cameras have become the standard, with landscape photographs preferring full-frame DSLR cameras. They are focused by a lens, which is changeable, allowing the photographer to swap lenses quickly and easily, capturing an image within a matter of seconds, due to the ability to adjust the settings of the camera. The latest models are lightweight and easily portable, allowing photographers to easily access different locations. The DSLR cameras create digital photographs which means that there is no need for the use of dark rooms or the hazardous chemical processing that was once needed, and can now be viewed, processed and adjusted with the use of a computer. In recent years, it isn’t only the camera itself that has improved, the editing process of the images produced has also been affected by the technology advancements. Before, when an image was shot, it was produced slowly in a dark room. That was all that was available to them, unlike the present day where almost every photograph is manipulated or processed on the computer using software such as Photoshop or Lightroom. This allows for either small, minute changes to be made, something like editing a spot or stain out, or for a completely new object to be added in or removed. However, it can also be used in a way that brings the images to life, altering the exposure and sharpness of the images.

However, more and more DSLR cameras are being disused as the technology has advanced from within the mobile phone industry. The latest phones can capture high quality images, but unlike the DSLR cameras, there is no need for manually adjusting the camera settings as it is automatically completed for the photographer. These are smaller, more convenient and easier to use without the need for any knowledge of photography whatsoever. Of course this does mean that not all images will be perfect but for the newer generation they are much more appealing. [iv] However from Ansel Adam’s work techniques such as previsualisation, the zone system and dodge and burn enabled the photographers to develop an aesthetic linked to pictorialism. This means that smartphone photographers may find it difficult to convey their own style due to the automated settings that are placed onto the image, allowing the photographer very little control of the outcome.

Photographers research

One photographer that relates to my project is Michael Kenna, a landscape photographer who only photographs in black and white and focuses on “the atmospheric effects of photographing at night, in crepuscular light or in mist, fog and snow.” He prints with the use of a darkroom, allowing him to control the tonality of his images as well as controlling the mood that is being perceived by the viewer. [V]

figure 4

This image, figure 4, consists of a field, with the lines of the crop drawing the views eyes up the image, towards a grouping of trees, forcing the viewer to see the many different tones that the sky contains. The mood of the image is determined by the gradient of the sky, with the contrasting tones of the crop compared to the trees. The image has more of an impact to the viewers because it is in black and white. I think that if the image was in colour, the emphasis on the open, simplistic field would be lost, and would cause the viewer to be distracted by the colourful sky and green fields. The focal point of this image is the trees, with the lines of the crops leading the viewers eyes towards them. The rule of thirds looks as if it has been used to compose this image. The image is very sharp, capturing even the smallest of details, the crop for example. This means that Kenna probably used a short exposure time to create this image, as well as a wide (deep) depth of field that has been used.

Figure 5

This photograph, figure 5, like a lot of Michael Kenna’s work, is very simplistic. The two rows of posts within the water draw the viewer’s eyes to look deeper into the image, into the mist that covers the island in the background. The focal point of the image is the posts. However, when looking at the image closer, the amount of detail is massive. The reflection on the surface of the water and the simplicity of the image allows the image to be very powerful in its own way, making the viewer reflect on their own self. In my opinion, I think this image is very raw, and untouched, just like the location. There are very little signs of the footprints that we humans leave behind us and the minimalistic editing that has been done on this image, reinforces this. This image looks like it has not been composed using the rule of thirds unlike the previous image, however, the image being centred highlights the symmetry within the photograph and makes the focal point more confrontational and in the viewers face.

Figure 6

In figure 6, the moving clouds bring emotion to the image as well as capturing the focus of the viewer. The different tones in this image bring the image to life and not allowing it to be flat. This lack of colour accentuates the light and shadows within the image, and the large contrasts within the image bring the viewers’ attention quicker than if it were to be in colour. Being in black and white, it makes the viewer’s pause and look at the image closely, allowing them to focus on the focus of the image. In this image, the focus is of the sky, and its reflection on the water, broken by the paired posts.

Another photographer that would interlink with my project would be Art Wolfe. Art Wolfe, an American photographer that is best known for his colour filled images of landscapes, wildlife and native cultures. This photographer, unlike the one previously mentioned, shoots and edits all his images in colour. Wolfe uses a Canon camera with multiple lenses including macro and telephoto lenses. [vi] [vii]

Figure 7

This image, figure 7, although simple, has captured every tiny detail that is present. A macro lens has been used, which has allowed the photographer to create a photograph that is extremely close to the object. The leaves of the plant are covered in water droplets, some larger than others, which has made the image have an added flare. The water droplets make the photograph stand out compared to the average photo of a plant. As well as the macro lens that has been used to magnify the image, the water droplets add extra magnification and depth, really making the fibres on the leave to make an appearance. After some investigation, I have found that the photographer also used an ‘extension tube’. This extra piece of equipment makes a large gap between the lens and the cables which enables Wolfe to get closer to the object that he is photographing. The macro lens allows the intricacy of natural forms to be viewed at macro scales.

Figure 8

This image, figure 8, although not the most fantastical image Art Wolfe has taken, once again shows how close the photographs can be, and, although this image is very close, the object is instantly identifiable. The camera has captured every vein on the leaf, adding texture to the image. None of Art Wolfe’s images are ‘doctored’ or ‘Photoshopped’ meaning that the colours are all raw and how they were at the time of the shoot. Being so close to the object slows the viewers down and makes them question what they are looking at. For example, in the image above, it looks as if there is a stick insect present. There is no way to confirm this however, it could raise a few questions. The macro photography allows nature to be captured in its original form, untouched.

Another photographer, Pip, is a self-taught landscape photographer, bringing his vision to wider audiences through high end commissions and moving images.

Figure 9

Figure 9, an eerie atmosphere is conveyed with the contrast between the lighter, soft, cloudy sky against the abrupt, sharp, dark trees. The blue tinted sky produces a cold and distant atmosphere within the image and helps to depict the stillness of the surrounding trees. the photograph was taken with a high magnitude, producing a dark and dim image, with nothing but the outline of the trees to focus on.

Relevance of the photographer’s research to my personal project

My personal project links to my photographer’s research because of the subject, landscape photography. I would like to attempt to include a lot of the techniques that have been used, within the photographer’s images, in my own photographs more frequently, including the use of the ‘golden rule’ and the ‘rule of thirds’ as well as the macro techniques. I would like to try and invest in an extension tube in order to further improve my macro technique which I think will bring another dimension to my images.

In this image, shot by myself, I have used the rule of thirds to compose it. The image’s composition builds interest within the image and makes it stronger overall. This image was shot using a macro lens, creating the sharp, crisp focus on the flower.

A photographer that particularly influenced me during this miniseries of images was Patty Hankins, a professional fine art floral photographer. Not only does she photograph the flowers in nature, untouched, but she also takes them into a studio, allowing her to pay closer attention to the details that aren’t visible outside.

Then, in the photo above, the golden rule was used. By using this rule, the image is very pleasing on the eye. The soft colours, produced by the light, were then edited within Photoshop.  A macro lens was also used within this image.

The future

In the future, being almost eighteen years since the first model, the Nikon D1, was released, there is a high chance that DSLR cameras will become a thing of the past. The rising figures show that smartphones are becoming more popular than ever for photography with digital camera sales declining by over eighty percent since 2010. By using a smartphone, there is a shrinkage in the amount of equipment that is required to be carried around, yet due to the camera quality improving faster than ever, everyone will soon have a top quality camera in their pocket that is available to post on social media within seconds, with no editing process required. Smartphones also allow the most inexperienced of photographers, or even the general public, to operate, with no settings to adjust or lenses to carry and swap.

Artificial intelligence is also making an appearance within the latest cameras, with built in computing components performing tasks that were once required to do manually, such as automatic focussing and automatic exposures, making it easier to create the ‘perfect’ image at the push of a button.

The editing process is also likely to change, with most photographers currently spending more time on the processing of the images than completing the shoot. With the most well focused, balanced and optimum images being selected and the RAW files being automatically adjusted, applying the perfect tonal adjustments, set a correct white balance, sharpening and softening, it could save hours of extra work, and allow even the most amateur photographers to produce professional looking images.

Already, a connection between the newest edition cameras and the smartphones are possible, through either Bluetooth or Wi-Fi, backing up all images, edited or RAW, when the camera is in the suitable conditions. Soon, cameras will be able to automatically connect to the Wi-Fi, ridding the need for an SD card or other physical storage, and reducing the risk of losing the memory card, damaging, or corrupting the files.

As new technologies continue to emerge and develop, the way in which we view the images may change too. The virtual reality concept is still being developed however, once finished, it will have a huge impact and change photography as we know it completely. With photographs still being viewed in a 2D experience, how long will it be until they are being brought to life, having the sounds as well as the image itself? This would allow people to relive the moment that has been captured, almost permitting for the memory to be explored multiple times over. [viii]

Conclusion

When continuing with my project I hope to continue to develop my technique when working with macro photography whilst also continuing to sustain my eye for compositional elements within my photography. With regards to the editing process, I want to bring a more experimental element into my project, this includes returning to locations where I have previously shot, then stitching, layering or presenting the comparison images together, illustrating the change in the landscape. I would also like to attempt in using video footage to produce a time-lapse of the seasonal days.

My research has shown that the technology that we use within our photography, to enable use to create the best images, that stand out from the crowd and what we class as ‘advanced’ or ‘the best’ is nothing compared to what is going to be released in the coming decade. It will turn the ideas and concept that we consider ‘advanced’ and will force us to reconsider the ‘best photographers’. The technology will bring a new, alternate method of photography and will allow current photographers to achieve things that people such as Nicéphore Niépce and Ansel Adams could never even have dreamed of.


Reference and Biliography of all sources used

[i] AMBROSE, D.

A Brief History of Landscape Photography

Bibliography: Ambrose, D. (2019). A Brief History of Landscape Photography. [online] Light Stalking. Available at: https://lightstalking.com/history-landscape-photography/ [Accessed 18 Nov. 2019].

[ii] GUM BICHROMATE

(En.wikipedia.org, 2019)

Bibliography: En.wikipedia.org. (2019). Gum dichromate. [online] Available at: https://en.wikipedia.org/wiki/Gum_bichromate  [Accessed 18 Nov. 2019].

[iii] ANSEL ADAMS

(En.wikipedia.org, 2019)

Bibliography: En.wikipedia.org. (2019). Ansel Adams. [online] Available at: https://en.wikipedia.org/wiki/Ansel_Adams  [Accessed 18 Nov. 2019].

[iv] DIGITAL PHOTOGRAPHY

(En.wikipedia.org, 2019)

Bibliography: En.wikipedia.org. (2019). Digital photography. [online] Available at: https://en.wikipedia.org/wiki/Digital_photography [Accessed 18 Nov. 2019].

[v] MICHAEL KENNA | PHOTOGRAPHER’S BIOGRAPHY & ART WORKS | HUXLEY-PARLOUR GALLERY

(Huxley-Parlour Gallery, 2019)

Bibliography: Huxley-Parlour Gallery. (2019). Michael Kenna | Photographer’s Biography & Art Works | Huxley-Parlour Gallery. [online] Available at: https://huxleyparlour.com/artists/michael-kenna/ [Accessed 18 Nov. 2019].

[vi] Art Wolfe

Bibliography: En.wikipedia.org. (2019). Art Wolfe. [online] Available at: https://en.wikipedia.org/wiki/Art_Wolfe [Accessed 25 Nov. 2019].

[vii] Art Wolfe’s Intimate Landscapes

Bibliography: B&H Explora. (2019). Art Wolfe’s Intimate Landscapes. [online] Available at: https://www.bhphotovideo.com/explora/photography/features/art-wolfes-intimate-landscapes [Accessed 25 Nov. 2019].

[viii] Bibliography: DigitalNet. (2019). How are Smartphones Shaping the Future of Photography? [online] Available at: https://digitalrev.com/2017/05/11/how-are-smartphones-shaping-the-future-of-photography/

[Accessed 5 Dec. 2019].

Figure 1 –BibliographyAnon, (2019). [image] Available at: http://100photos.time.com/photos/joseph-niepce-first-photograph-window-le-gras [Accessed 18 Nov. 2019].

Figure 2 – Bibliography: Anon, (2019). [image] Available at: https://www.google.com/url?sa=i&source=images&cd=&ved=2ahUKEwjHqZKMjvTlAhWh34UKHWGRAQsQjRx6BAgBEAQ&url=https%3A%2F%2Fen.wikipedia.org%2Fwiki%2FThe_Pond%25E2%2580%2594Moonlight&psig=AOvVaw1RYInc7DungdVVfBaulSvm&ust=1574178515234769 [Accessed 18 Nov. 2019].

Figure 3 – Bibliography: Anon, (2019). [image] Available at: https://www.google.com/url?sa=i&source=images&cd=&ved=2ahUKEwiA4JHYjvTlAhVQUxoKHXN2CFAQjRx6BAgBEAQ&url=https%3A%2F%2Ftheculturetrip.com%2Fnorth-america%2Fusa%2Fcalifornia%2Farticles%2Fthe-ansel-adams-biography-pioneering-wildlife-photographer%2F&psig=AOvVaw20THtY6eHZFq0VZlB9EhdA&ust=1574178668662881 [Accessed 18 Nov. 2019].

Figure 4 – Bibliography: Anon, (2019). [image] Available at: https://www.google.com/url?sa=i&source=images&cd=&ved=2ahUKEwi7wqqEj_TlAhUDCxoKHXpTCvMQjRx6BAgBEAQ&url=https%3A%2F%2Fwww.jacksonfineart.com%2Fartists%2Fmichael-kenna%2F&psig=AOvVaw0EXDVFN7duOZmZewKkeSaa&ust=1574178768089240 [Accessed 18 Nov. 2019].

Figure 5 – Bibliography: Anon, (2019). [image] Available at: https://www.google.com/url?sa=i&source=images&cd=&cad=rja&uact=8&ved=2ahUKEwi__8yrj_TlAhWNzIUKHbuJBU0QjRx6BAgBEAQ&url=%2Furl%3Fsa%3Di%26source%3Dimages%26cd%3D%26ved%3D%26url%3Dhttps%253A%252F%252Fwww.johnpaulcaponigro.com%252Fblog%252F14960%252F18-quotes-by-photographer-michael-kenna%252F%26psig%3DAOvVaw0EXDVFN7duOZmZewKkeSaa%26ust%3D1574178768089240&psig=AOvVaw0EXDVFN7duOZmZewKkeSaa&ust=1574178768089240 [Accessed 18 Nov. 2019].

Figure 6– Bibliography: Anon, (2019). [image] Available at: https://www.google.com/url?sa=i&source=images&cd=&cad=rja&uact=8&ved=2ahUKEwitubv0jfvlAhXy8eAKHcZ4BYgQjRx6BAgBEAQ&url=http%3A%2F%2Fhalsey.cofc.edu%2Fmain-events%2Fartist-lecture-michael-kenna%2F&psig=AOvVaw1m45zhPs0XNVveABKNZY7Q&ust=1574418950306666  [Accessed 21 Nov. 2019].

Figure 7 – Bibliography: Anon, (2019). [image] Available at: https://static.bhphotovideo.com/explora/sites/default/files/01-artwolfe_rain0808300021.jpg  [Accessed 25 Nov. 2019].

Figure 8 – Bibliography: Anon, (2019). [image] Available at: https://www.bhphotovideo.com/explora/photography/features/art-wolfes-intimate-landscapes [Accessed 25 Nov. 2019].

Figure 9 – Bibliography: Anon, (2019). [image] Available at:

https://www.theaop.org/var/uploads/cache/filemanager/1/0/105514/f834e04580fb0456b9341f5ed6bd88c6/pipforestofdean.jpg [Accessed 25 Nov. 2019].

Kate Watson A Level Photography

Illustrated Project proposal

Component 1

My Ideas

  • Horses
  • Nature
  • Macro – Plants, Bugs, Eyes, Hair
  • Summer time
  • Harvest

My Personal investigation is:  to create a visual record of the different seasons. The investigation will explore the countryside in Summer, Autumn and the beginning of winter and the animals, flowers and landscapes in which each season brings. I will record harvest time and what comes with it including the machinery, as well as capturing the physical changes in animals such as Deer as the year progresses.

Background

I’ve decided that I would like to focus on the countryside in different seasons. This idea was inspired by my love for the outdoors and during this topic I plan to travel to different settings such as Wheat, Barley, Flax and Rape seed crops, Rivers, and Woodland areas. I would also like to explore how the weather effects these settings.

I’d like to begin this subject with shooting ‘summer time’, such as the insects (Butterflies, Bees etc.) that are usually only seen in the summer, Crops, and experimenting with how these look in different conditions such as rain (with rain drops). I think that this is a good starting point for me as I can take lots of photos over the summer holidays.

Photographers Research

I have researched some different styles of nature photography, and have found some familiar photographers that I have already studied before, as well as some new photographers such as Edward Weston, Peter Dombrovskis, Art Wolfe and Clyde Butcher. A couple of these photographers shot in the second half of the nineties, using black and white photos which I would be interested to explore. I will use all of these photographers work as inspiration for my own project over the summer.

I plan to approach this project by shooting the main aspect of country living, which is where animals and industrial machines collide, crop fields. I want to explore different animals that find food and seek shelter in the crop fields such as Butterflies and Bees on the flax fields as well as how the light effects the look of the wheat fields.

Illustrations

Whilst researching photographer, I came across a few photographs that have also influenced me as well, such as the images below:

This is the type of image I hope to take of a bee. I like this photo because of the colour, which has made detail in the flower stand out just as much as the bee. I also like this image because of the technique used, macro. This technique, causes the main object in the image to become in focus, however the background is blurred out, this creates an image that is very pleasing to the eye, keeping the colour of the background but loosing the detail.

In both images, above and below, how the light can effect photography is shown, as well as the time of the year. I would like to experiment with what kind of images I can take when they are shot in different times of the day, early in the morning, in the middle of the day and in the evening (sunset).

In the image below, it is similar to that of the Bee, however, it focuses more on the insect that the plant, showing the intricacies of the wings and tiny fibres of hair, making it seem like the fly in not as delicate and as small as it seems in real life.

I would also like to capture some harvest images, I like the contrasting ideas of machinery and nature, showing how humans can adapt and utilise the world around them at the detriment of the animals that without, our crops couldn’t grow.

Techniques

The techniques I intend to explore as part of my project are:

– Macro photography,

– Wide and telephoto photography

– Colour saturation,

– Shallow depth of field,

– Double exposure,

– Retiring to the same location,

– Video footage.

Macro Photography

  • Most camera manufactures sell Macro lens which allow photographers to expand the image to greater than 1:1. these lens’ are quite expensive, alternatively learners can use the camera in macro mode if available (this may not be as effective as a dedicated lens).
  • Use point of focus OR manual focus
  • Use A TRIPOD to frame the object and background, apply compositional rules where possible.
  • Experiment with depth of field, you will be very close to your subject which results in a sudden drop off on focus, to overcome this you might want to maximize your depth of field therefore shoot at f 16 f22. In other circumstances you may like the drop off in focus in which case use a lower f stop e.g. 4.0
  • Work with a low/medium ISO from 100 to 400
  • Apply manual exposure and the exposure meter to ensure that the subject is adequately exposed.
  • In some case you may choose to use flash light

A macro photograph is one in which the size of the subject on the negative or image sensor is life size or greater, although most of the time we will end up looking at a large size image of a really small insect or flower, for example

Image bank

My images

In the following images, I have used a macro lens – Tameron 70-300mm. This lens allowed me to get closer to wildlife such as hoverflies, butterflies and bees and capture the finer details like their wings which with a standard lens would not have been possible. All of my images are shot in Raw format and have all been edited in photoshop.

Canon EOS 1000D, F/5.6, ISO – 400, 1/400, Focal length – 300mmm

In the photograph above, I like the contrast between the strong yellow and black colouring of the hoverfly and the soft pink of the flower in which it is sat upon. The macro lens allowed me to capture the intricate details of the wings. I edited this image in Photoshop, increasing the contrast and the clarity of the image, which gives a crisp look to the image. I played around with the curves also, in order to really bring out the colourful summer flower.

Canon EOS 1000D, F/5.6, ISO 400, 1/1250, Focal length – 300mm

In this image, I think that less is more. The individual flower, with the pollen in focus shows vulnerability and beauty at the same time. In photoshop, I also used the blur tool to bring focus to the flower and used the sharpen tool.

Canon EOS 1000D, F/5.6, 1/1000, ISO 600
Canon EOS 1000D, F/5.6, 1/400, Focal length 300mm
Canon EOS 1000D, F/5.6, 1/250, ISO-400, Focal length 300mm

Personally, I think that the visual outcome of my images are good, I have been playing around with my macro lens for a while and I feel that my images are getting better and better with each shoot which means that these images did come out the way I wanted.

Progression – I would like to continue using this technique within my personal investigation. i would also like to refine my work by reducing the saturation on my images in future.

Wide Angle and Telephoto photography

       RECORD THE TELEPHOTO SETTINGS

       Make a note as to whether you have observed distortion effects at small focal lengths (wide angle) compared to long focal lengths (telephoto)

       Whilst the wide angle lens should generally be avoided for portraiture because of the distortion effects, it can be used in certain instances in a creative way.

    The higher the telephoto setting the shallower the depth of field… you may notice this when photographing close up using a telephoto setting of e.g. 100 mm

Focal Length       Lens TypeCommon Subjects     
       8mm – 24mm      Ultra wide angle (fisheye)      Wide panoramas and skyscapes, artistic
       24mm – 35mm      Wide angle      Interiors, architecture, landscapes
      35mm – 85mm (50mm common)             Standard      General purpose
      85mm – 135mm      Short telephoto      Portraits, candid
      135mm – 300mm      Medium telephoto      Close sports, action
      300mm+      Super telephoto      Far sports, wildlife, nature, astronomy
Image result for telephoto wild life photography birds
Here is an example of telephoto photography.

All of these images are taken using a wide lens. I will be experiementing with this over a couple of shoots to see whether i would like to continue to use this in my own work.

My images

The following images were taken with a zoom lens, 70-300mm white a field of silage was being harvested.

Canon EOS 1000D, F/5.6, 1/2000, ISO-400, Focal length 55mm
Canon EOS 1000D, F/11, 1/400, ISO-200, Focal length 53mm
Canon EOS 1000D, F/4.5, 1/3200, ISO-200, Focal length 33mm

The above images were all shot in raw format. this means that in Photoshop I can control more adjustments made to the final image. in the above images, I adjusted the Contrast, Highlights and Darkening settings, then used tools such as curves and dodging and burning to help create the final images. However, with photographs like the bird, this required me to adapt my settings at the time of the shoot (on my camera) in order for the bird to be seen against the bright blue sky.

Canon EOS 1000D, F/5.6, 1/4000, ISO-1600, Focal length 28mm

This image was also taken with the lens that I used in the first images, however, the light at the time of the shoot was not in my favour, so the images have not come out how I would have ideally liked, However, I still decided to edit the images in photoshop to see if there was anyway that I could adjust them in order to create a better image, and these are the results

Personally, I think that my final images are good, and they have come out as I had expected them to.

Progression – I would like to continue studying this method of photography as I feel like I could easily improve on my images with some practise.

Animated GIF

How to create an animated GIF

Animated gif’s can be created from still images.

To do this you WILL need to RESIZE YOUR IMAGES TO AN APPROPRIATE SIZE AND RESOLUTION FOR THE WEB…

For example 72 dpi, and 900 x 600 pixels, You can do this by selecting Image, Image size and set the dimensions above whilst selecting the Re sample option.

Load your images that you want to create an animation with.   Import the images into the Photoshop file and organise the layers as the sequence that you want to animate. Layer 1, 2, 3, etc.

·         Select Widow, Timeline,

·         Select Create video time line

·         Drag the images into the time line and adjust each clip duration to e.g. 5 frames

·         Order the images in the sequence that you want to show.

·         To test the animated gif you need to press the play button

·         To loop the video you will need to select the “set the playback options button” and then press play.

·         To save the animation you need to select File, Save for web.

At this point you need to ensure the animation is looped see the image below and that you have selected a gif  file option and 128 dithered

My image

To take the images made in this GIF, I used a tripod, to make sure that the camera was kept still, reducing the risk of shake, and to make sure that the only movement in this specific GIF was the horse. I also used a fast shutter speed in order to capture these images, without movement blur.

To edit these images, I used photoshop, adjusting the colour balance, and the highlights.

I would like to keep exploring this technique before I decide whether or not I would like to use this in my work as I’m not sure if it would suit my style of photography.

Sequencing Techniques

In this work diary I hope to explore the methods of sequencing techniques within my work, exploring what difficulties I may face when shooting and editing these sorts of images.

Image bank

For this technique I used the following settings –

  • manual settings (fixed exposure)
  • manual focus
  • a tripod – to minimise camera shake
  • directed the shoot
  • fast shutter speed

My Images

In the image above, I used Photoshop to create this sequence. I think that the image has turned out well, considering I am new to this technique.

I don’t think that this image (above) is as good as the first, I think that I need to do some refining if I were to use this as a final image.

I think that although I am happy with the outcome of this image, and am willing to try again and improve on mhy techniques, I dont think that I will be incorporating this into my work.

Video footage

In this work diary, I hope to explore the methods of Videoing within my work, exploring the difficulties that I may face when shooting the footage and editing them. When I am experimenting with capturing video footage, I would also like to explore the use of time-lapse within my work.

In order to capture video footage or time-lapse I would need to ensure that the camera is kept steady, to avoid shaking of the camera which will result in poor quality footage being produced. If I was shooting a time-lapse in particular, i would require a tripod to ensure that there is no movement of the camera lens. However, if I were to shoot ‘walk through’ footage, I may need to look at stabilisers which would also ensure that I am capturing the most steady footage possible.

In regards to camera settings, I would need to have a slower shutter speed such as 1/30 or 1/60 (a frame rate of around 25 FPS) which would give the most natural motion blur.

an F-stop of f-8 would give a higher aperture, allowing less light through the lens thus creating a wider depth of field that if a lower f-stop such as 1.8 was used.

When reviewing the ISO that I would use, a higher ISO would increase the chance of noise or grain entering the footage. Due to this, I will be aiming to look at using an ISO of 100-400 which will hopefully produce a better quality of footage compared to an ISO of 1600 and above.

Contextual and Critical Analysis

Definitions

Connotation – an idea or feeling which a word invokes for a person in addition to its literal or primary meaning.

Denotation – primary meaning of a word, in contrast to the feelings or ideas that the word suggests

Semiotics – observation of symbolism used within photography or “reading” the picture

Punctum – an object or image that jumps out at the viewer within a photograph

Mendel Grossman – The Lodz Ghetto photographer

Mendel Grossman was a Jewish photographer in the Lodz (Litzmannstadt) ghetto, born in 1913. He was a slim man of less than average height with sloping shoulders, his coat hanging on him as if it were not cut to his size, even his shoes appearing too large for him.

His eyes expressed goodness, a clever smile played on his lips, his steps were measured and he always carried a stuffed briefcase.  That was Mendel Grossman, a young man of a Hasidic family, the type of a former Talmudic student who had left the straight and narrow path. He was avid for knowledge, a lover of literature, the theatre and the arts, a painter, a sculptor, and also an amateur photographer who believed that photography was an art. 

His photographs flowers, still-life, landscapes, street scenes, portraits, taken against the background of clouds, were works of art filled with expression, leaving strong impressions on the viewer. Eventually Mendel Grossman began to concentrate on one subject – man in motion. The transition came abruptly, and by accident. The Habimah theatre was visiting Lodz and Mendel hidden in the wings, photographed the performances

No one asked him to do it he did it for himself alone. Here were men and women in motion, in classical motion there was dancing, varied and strange facial expressions, laughter, fear, pain, as well as make-up, costumes, light, stage settings.

When later he locked himself in his darkroom to develop the films he was astonished by the power of his photographs, he actually succeeded in arresting men in motion. All those who saw the pictures extolled their excellence, but Mendel knew that he was only at the beginning of this particular journey.

Habimah left, and Mendel directed his lens to the street, to the suburbs inhabited by Jews, the slums. He now found motion and expression not on the stage, but in the streets, among children playing, labourers at work in the Jewish quarter of Baluty.

His photographs gained a measure of respect, and Mendel achieved recognition as an artist- photographer. In the beginning of 1939, the management of TOZ, the Jewish organisation for the protection of children’s health, approached him with an attractive proposition – to prepare an album of pictures of Jewish children.

The accent was to be on the poor Jewish child in the streets. Mendel enthusiastically accepted the proposition and was soon ready with a series of photographs. It was the summer of 1939, the album never appeared and the photographs got lost in the war, and at the same time so did their subjects the Jewish child.

The idyllic life of discussions on art ceased with the outbreak of war and the first contact with a brutal occupier, then the Star of David to denote a Jew, and the creation of ghettos. Mendel was ready with his camera. No longer did he photograph flowers, clouds, still life’s and landscapes. In the horror of the Lodz ghetto he had found his mission, to photograph and thus record the great tragedy taking place in the ghetto before his eyes.

Mendel Grossman knew how to photograph, he knew how to observe and perceive what happened around him, and what is most important – he saw the people surrounding him. He photographed them in their suffering, as they sank into the depths of pain, in their struggles, in their illnesses, and in their death.

He recorded with his camera what took place in the tortured ghetto, the Holocaust at its intensity. He gave up his artistic ambitions of the past, his mission was now clear, to leave to the world – if a world was to remain – a tangible testimony of the great tragedy, of the horrible crime, in a language understood by all nations.

Evicted from his house in the centre of town, Mendel found a flat in the ghetto where he settled with his parents, two sisters, brother –in-law and little nephew. The story of his family is typical of Jewish families in Lodz. Mendel realised this, and intensively photographed his loved ones, so that over the years he created a horrifying record of their slow progress toward death.

Mendel obtained a job in the photographic laboratory of the department of statistics in the ghetto, the office in which all the true information concerning the ghetto was collected. Covered by its official status, the staff of the department accumulated written material.

They did not only record dry facts, as statisticians usually do, but wrote down every rumour passing through the ghetto, every change in the distribution of food rations, every event no matter how unimportant. They also collected photographs, ostensibly to demonstrate models of products of the ghetto workshops, and identification photographs for work permits. The laboratory had a good supply of film and printing paper, and also served as an ideal camouflage for Mendel’s real job.

They did not only record dry facts, as statisticians usually do, but wrote down every rumour passing through the ghetto, every change in the distribution of food rations, every event no matter how unimportant. They also collected photographs, ostensibly to demonstrate models of products of the ghetto workshops, and identification photographs for work permits. The laboratory had a good supply of film and printing paper, and also served as an ideal camouflage for Mendel’s real job.

He spent most of his time in the streets, in the narrow alleys, in homes, in soup kitchens, in bread lines, in workshops, at the cemetery. The chief subject was people. He did not seek beauty, for there was no beauty in the ghetto, there were children bloated with hunger, eyes searching for a crust of bread, living “death notices” as those near death, but still on their feet were called in ghetto slang.

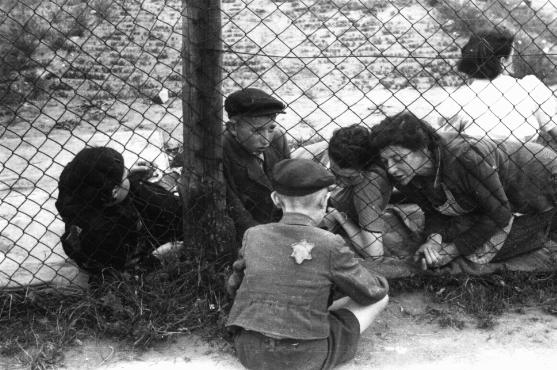
He photographed conveys of men and women condemned to death in the gas-vans of Chelmno, public executions, in one incident, a whole family passed through the street dragging a wagon filled with excrement, a father, mother, son and daughter, the parents in front pulling, and the children pushing from the sides.

Mendel stopped but did not take out his camera, he hesitated to photograph the degradation of those people. But the head of the family halted and asked Mendel to photograph, “Let it remain for the future, let others know humiliated we were.” Mendel no longer hesitated, he gave into the urge which motivated so many Jews to leave a record, to write down the events, to collect documents, to scratch a name on the wall of the prison cell, to write next to the name of the condemned the word “vengeance.”

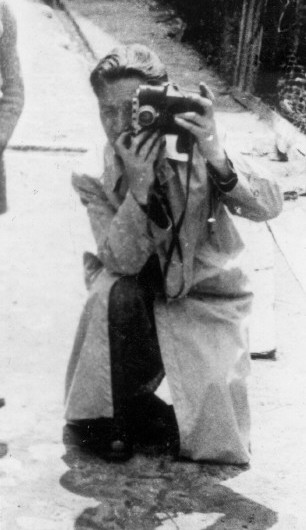
Mendel had heart trouble and he was forbidden to make any physical effort. The Gestapo was also on his tracks and his friends warned him, his family insisted that he stop endangering his life. But he did not heed any warnings, no event in the ghetto passed without him photographing it. To fool the police he carried his camera under his coat.

He kept his hands in his pockets, which were cut open inside, and he thus could manipulate the camera. He directed the lens by turning his body in the direction he wanted, then slightly parted his coat, and clicked the shutter. This method worked very well. 

In one of the stages of the destruction of the Jewish people the Germans deported the remnants of the Jewish communities of Germany, Austria, Czechoslovakia and Luxemburg, and brought them to the Lodz ghetto. Mendel received the arrivals with camera in hand. Here were characters of a new kind, with a different appearance, different manners. They were well dressed, they carried heavy suitcases, were well provided with food. 

They were horror stricken at the sight of the ghetto, they refused contact with the old inhabitants of the ghetto whose appearance repelled them. They tried to swim against the current and quickly gave up, they collapsed spiritually and physically.

Mendel and his camera followed this process which ended when the Germans collected the pitiful remnants and again loaded them onto trains, this time the trains were bound for Chelmno. Mendel after taking a long distance photo, hidden in a room overlooking Bazarny Square of an execution of a Jew from Vienna, who had been arrested outside of the ghetto, was able to photograph another execution close up.

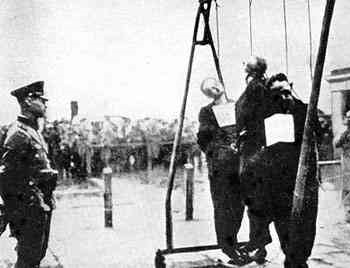
On a cloudy day he again ventured out with his camera this time to an open field on Marysinska Street. Unlike the first time, Mendel did not take up a protected position, but stood behind a German policeman, in the front row of the crowd.

As usual the camera was suspended from a strap around his neck, the coat was slightly parted, and his hands under the coat directed the lens to the scaffold. The condemned young man, was brought in a cart. He still did not realise what was going to happen to him. He noticed at first a large crowd, and then the dangling noose. Now he knew. Without uttering a sound he ascended the scaffold, his head down.

The crowd held its breath, the distant cries of the condemned man’s wife also ceased. The German’s were tense as the hangman tightened the noose around the victim’s neck. Mendel clicked the shutter, the silence was so absolute that even this muted sound reached the ears of a German policeman, and he turned his head.

Pale with excitement, Mendel returned to the small darkroom in his flat to develop the picture. This time the photograph was clear in every detail.

Still Mendel thought that he should change his technique, from then on he climbed electric power posts to photograph a convoy of deportees on their way to the trains, he walked roofs, climbed the steeple of a church that remained within the confines of the ghetto in order to photograph a change of guard at the barbed-wire fence.

Weak and sick, he found it difficult to accomplish all those feats, but he was contemptuous of danger and did not heed the pleadings of friends. Inside the church he discovered a strange world – a surrealistic picture which could be only the product of morbid fantasy – the entire interior was covered with a thick layer of white feathers.

Waves of feathers rose into the air with each step, each movement. Every breeze caused a cloud of feathers to form in the air. The altar of carved wood, the figures of the saints, and the huge organ – all were covered with feathers, all undulated in the breeze.

Amidst all that he saw human figures, also wrapped in white, sitting, running around, standing. A small sign attached to the entrance attempted to explain what was happening inside. It read Institute for Feather Cleaning, but the sign did not tell the whole truth. The Church was the place to which the bedding robbed from Jews who were sent to death from Lodz and surrounding towns was being brought.

There, in the Church of the Virgin Mary, the pillows and featherbeds were ripped open by Jewish men and women, then the feathers were cleaned, sorted, packed and shipped to Germany, to merchants who sold them in the Reich.

Mendel spent many weeks in the church, covered with feathers. He looked for varied angles which would fully explain to future generations what was happening in that church. He created evidence of the crime, the full extent of which was not yet known to him. Only his intuition told him that this must be recorded.

The collection of negatives grew from day to day its contents became richer and more varied. The negatives were hidden in round tin cans, among them a can full of negatives from the performances of Habimah in Lodz in 1938.

Mendel again and again stressed in conversations with friends that he expected those negatives eventually to reach Tel Aviv and be given to the theatre. He did not speak of the plans for the future – he only wanted his photographs to be exhibited as testimony of what took place in the ghetto.

The desire to record, to record at all costs, had become part of the consciousness of the inhabitants of the ghetto. All parts of the community had become permeated by this desire, and Mendel with his camera was received with open arms and with full understanding, in workshops, in hospitals, in orphanages, in offices, in the streets.

In 1942 the Germans announced a new deportation from the ghetto and the Gestapo and members of the Kripo went from house to house selecting Jews for death. Dead bodies were collected and thrown on a heap in the cemetery. Mendel decided he need to record these events, Mendel attached himself to the gravediggers and went to the cemetery, with his camera in his hand.

Carts continued to bring in bodies but Mendel first turned his attention to the open mass grave, inside were deportees from the nearby town Zdunska Wola. They had died of suffocation in the tightly packed trains.

Mendel managed to take photographs before the gravediggers did their job of covering the evidence. Then with his slow steps he went to the hall reserved for memorials but which was now filled with bodies. From the distance the sound of rifle fire was heard, the “aktion” continued.

While photographing, Mendel marked the chests with numbers. The same numbers later appeared on the graves, and thus the families were able to identify the graves by first identifying their dead on the photographs.

The head of each body was lifted by a gravedigger, and Mendel went from one to another clicking, recording the bruised, bloody, crushed faces, faces of old people, of boys, of girls. Some of the eyes were closed, some half open, some half open, some stared with fear, some exuded the serenity of death.

The great deportation “aktion” was about to end, Mendel still managed to photograph the large wagons full of Jews condemned to death as they made their way to the concentration  places and from there to the railway station at Radegast. Again the trains rolled in the direction of Chelmno and the gas-vans and crematoria of “Sonderkommando Bothman” worked at full speed.

There followed “regular” days in the ghetto, and one could find Mendel in the streets and ghetto institutions, his lens directed toward the starving and the sick who were not allowed to be sick because there was no room for them in the ghetto, and therefore all medical institutions were liquidated. They remained only in Mendel’s photographs.

In 1943 deportations began again, the inhabitants of the ghetto still did not know to where the deportees were being taken. There were many rumours, most of them pessimistic, but some contained grains of hope.

Mendel sensed that the omens were bad, he suspected the Germans of taking the deportees to a place from which there was no return. He photographed almost exclusively the convoys, the places where the deportees were concentrated, the ghetto jail. Friends warned him against photographing the convoys, because Gestapo men were among the guards, and they would find him out. Again he heeded no warnings. In one of the ghetto workshops, a telescopic lens was being secretly constructed for him according to a sketch he prepared.

When completed, the lens performed satisfactorily, but was heavy and awkward to carry, Mendel was happy, because he could now photograph from a distance and from hiding places. He photographed the convoys from windows, following them until the deportees entered the death trains. He was in great danger when photographing the railroad station with the German police pushing the Jews into the trains.

He took the photographs hidden behind a stack of slabs of concrete belonging to a factory of prefabricated houses. The new lens did its work well.  Mendel showed particular interest in recording the activities of youth organisations in the ghetto. He appeared at meetings, photographed events.

All was open to him, the young people trusted him and Mendel discovered suddenly smiling faces, faith in the future, and care for fellow men. There were no longer orphanages and old people’s homes in the ghetto, and so he photographed the children in the workshops to which the entire population was mobilised.

He generously distributed copies of his photographs, he asked for no payments he let the pictures be kept by as many people as possible. Perhaps some would remain after the holocaust. Mendel spent his evenings locked in his darkroom, working till late at night. In the mornings he distributed prints among friends and acquaintances and kept only the negatives for himself.

He kept next to his enlarging apparatus a little crystal set with an earphone which was capable of receiving only the German radio station in Lodz. Thus he was informed on the progress of the war, but he did not indulge in commenting on the subject. His drawers were full of tin cans with more than then thousand negatives, the result of hard and stubborn work since the occupation. Those cans contained the images of people whose ashes were already scattered in the forests of Chelmno.

In them was the story of the suffering and destruction of a great Jewish community, the most telling proof of the greatest crime in human history. With the Red Army advancing on the eastern front, Mendel knew that he must now hide his precious negatives in a safe place. Mendel made a quick selection of negatives, packed the tin cans in a wooden crate.

With the help of a friend he took out a window sill in his apartment, removed some bricks, placed the crate in the hollow, then replaced the sill. The task was accomplished. The negatives seemed safe for the future. But Mendel retained his camera. The days of the Lodz ghetto final liquidation came, there was chaos everywhere, Mendel continued to photograph to the very end. He could no longer develop the film, the ghetto was almost empty.

Trains left twice a day for an unknown destination, one of the last to leave was Mendel, his camera hidden under his coat. Several days later the Gestapo found out about his activities when they found in some abandoned flats prints of his photographs – the definitive proof of their own crimes. Mendel was sent to the Konigs Wusterhausen labour camp, in the Reich where he secretly continued photographing, but not developing and printing.

When, the war front advanced and came closer, and the prisoners of the camp were taken out on the death march, Grossman collapsed and died with his camera on him. The negatives of his photographs hidden by him in the ghetto, were found by Mendel’s sister and sent to Israel, but most of them were lost during the War of Independence, when Egyptian troops captured the Nitzanim kibbutz.

One of Mendel’s closest friends Nahman Zonabend remained in the Lodz ghetto until its liberation. Although the Nazis kept him under constant surveillance, he succeeded in saving the archives of the Judenrat, and he concealed the documentary treasure, including some of Mendel’s photographs, at the bottom of a well.

After the war this material was taken out of Poland. The archives were collected and are now housed in the Museum of Holocaust and Resistance at the Ghetto Fighters House in Kibbutz Lohamei Hagetaot Israel. 

Also the photographs taken by Mendel Grossman were used in the book With a Camera in the Ghetto, published in America in 1977.

Essay

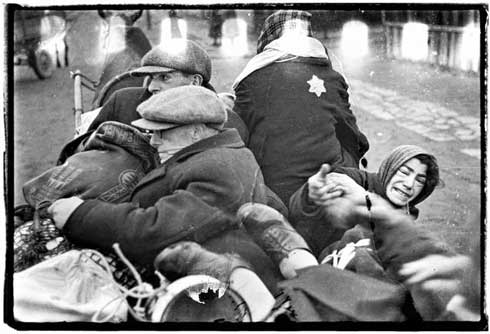
In 1939, during the second world war, Mendel Grossman and his family were placed into a ghetto in Lodz, Poland. Whilst inside the ghetto, Grossman found work as a photographer, his job to take photos suitable for identification cards as well as documenting the work that others where also doing. During the day, photographs were taken, however, Grossman had to hide his camera, usually under his coat. the photos were generally of the living conditions that him and many others were forced to live in.

This image has an empty alt attribute; its file name is untitled-3.png

In the photograph above, taken in an industrial area, containing tall chimneys and big warehouses, taken during the day, shown by the shadows that are visibly cast and the difference in the greys present in the overall image, with the foreground and background being at a much higher light intensity, compared to the objects that can be seen surrounding two children that appear to be the main focus of the image.

The two children appear to have been playing a game when Grossman captured the photo as they are standing, one behind the other. The child on the left is wearing clothes that children during the second world war would be found to typically wear. However, the child to the right, stood behind, is dressed in clothes that would be found on a police officer with a striped cap upon his head. He also wears an armband wrapped around his left arm, which is also holding a baton, placing it on the other child arm, with his right hand placed on the shoulder in front of him. The child at the front seems to be held there, as if in custody, whilst the child in uniform seems to be the authoritative figure, with a big smile on his face, enjoying the power it has given him.

This scene that has been created almost reflects the situation that the children are currently in. They seem to be mimicking scenes that would have taken place multiple times throughout a day, everyday . Due to the Lodz ghetto being established by the Nazi authorities, following the invasion of Poland in 1939. It was in the ghetto where people of Jewish religion where placed. The ghetto was a major industrial centre, manufacturing war supplies for Nazi Germany.

This image, includes the tall chimneys in the back ground, these could have been for two uses, to take any gases away that were produced from the machinery used to make war supplies, or they were leading off from the place where the bodies of the Jews were burnt and disposed of following them being taken to the gas chambers to be murdered. these gas chambers were used almost everyday during the Holocaust which started in September 1939 (Poland). This environment would have become normality for these children pictured along with over 3 million other Jewish people.

Personally, I feel that the punctum that is shown in the image is the baton in which the child, dressed in the uniform, is holding. It conveys the sense of authority that the Nazi had over the Jews. They were forced to do what ever was asked of them, and if they questioned, they were beaten. After they had outlived their usefulness, they were disposed of inside the gas chambers. It reflects the evilness that was contained within the Nazi Germany force under Hitlers rule.

Photographers research

Edward Weston

Edward Weston, 1886-1958, a 20th century photographer in America, was called “one of the most innovative and influential American photographers.” He photographed landscapes, still lives, portraits, and highly detailed images. I chose to research Edward Weston because of his high detailed images. I am really interested in the outcome of his images, showing the specific, intricate parts of each object. Using a studio Edward focused on composition lighting and form, this is something that I would like to experiment with in my photography.

This image of the vegetable leaf was shot using studio lights to create the black background and shadows which accentuate the texture of it. Because of the techniques used, it creates an image that captures the eye, causing it to question what it could be. I also feel that it makes you appreciate the finer details of every day objects that you may take for granted. The denotations shown through this image show the intricacy of life, the parts of the plants that go unnoticed. The black and white mask prevents the eye being drawn to the obvious, the plant is green, and the view is forced to look deeper at the everyday, well known object to see how much more there is to life.
This image, of a pumpkin was also shot in a studio using artificial light. the image, shot in black and white, allows a common object to be viewed in a way that would not be seen normally. Again, it forces the viewers to look deeper, into the parts that are often over looked, the individuality of each image, without becoming distract and bored by the obvious easily noticed parts.
this image, allows for individual interpretation. Although the object was a pepper, due to the clever positioning and lighting, the object could be viewed as many other things. Weston, by using these techniques in most of his images, especially in the four that i have chosen, makes you realise that nothing is ever looked at any more. the most well known parts are picked up yet the more interesting parts, the parts that make the plant individual are over looked.

I feel that Edward Weston has influenced me to try shooting within a studio. to experiment using the lights and different settings that are required to be used on your camera in order to capture the best images. I haven’t had much experience within a studio before and do not feel very comfortable when shooting however, I am open to trying to familiarise myself better with it. His work has made me more aware of what i should look for when choosing a subject, in order to make my work more original and individual instead of something that everyone else could create or easily reproduce.

Neil Mcintyre

I chose this photographer because I feel that Neil’s style of photography is similar to mine. I think that in his nature photography he has managed to capture the untouched and simplistic settings of the Scottish highlands.

Images

I like this image because it shows the wild animals in their natural habitat, but comfortable with the photographers presence. The image has captured the grace and elegance of the four stags showing their amazing ability to endure the coldest, harshest of weathers. The majestic ambience of the stags is conveyed through their proud and fearless stance that is shown to the photographer.
I like this image because of the simplistic colours that are used, along with the inquisitive deer in main focus, it creates a perfect image. Again, the image has captured the grace and elegance of the three stags showing their wild and inquisitive nature. The majestic ambience of the stags is conveyed through their proud and fearless stance that is shown to the photographer. this image also shows the untouched, innocent nature of the deer along with other wild animals.

For Neil’s work, he uses a Canon 1DX II, alongside two lenses, a Canon EF 500mm f/4 L IS II USM and a Canon EF 100-400mm f/4.5-5.6 L IS II USM. he also uses a tripod with a flexline ballhead, which allows horizon levelling to be quick and easy and is a good addition to the gear that is used when taking telephoto and macro shots.

Before seeing Neil’s work, I had not thought about how, just a photo of a couple of deer (for example), can make a landscape image so much more impacting. I would like to incorporate some of the techniques used by Neil Mcintyre as well as the subjects that he has used. I think that by incorporating this into my work, it will give my work an extra special touch.

George Logan

George Logan’s images are clearly not ‘natural’ and ‘untouched’ and are not my usual style of photography, however, Logan’s work shows such a high level of skill when it comes to both photography and editing. Although the photos would never be real, the level of editing makes it look so natural, so much so, it is impossible to tell that they weren’t real.

Images

This image, shows an adult hippo and a baby hippo on a wooden pier. The baby is sitting down, whilst both are looking intently into the water. The overall colour of the image is grey, with grey tones coming from every aspect of the image. This image, created by Logan, could be implying the effects of humans inhabiting almost every corner of the planet. There is little amounts of places that have no sign of humans, so much so, the animals are becoming acclimatised to it. Instead of being in the water, where they are usually found, they are looking down into the water, just like a human mother and child would do if they were looking for animals. The grey tones are to back up the emotions that come with the retaliation of the fact that we, as humans have ruined this planet, not only for ourselves, but for every animal too.
Image result for george logan chimpanzee
This image shows a chimpanzee sitting on a pavement, in what looks like a city such as London, with a McDonald’s box next to him and a cup. there is also a sign made out of cardboard, saying “Thousands of animals are made homeless every month. Help keep wildlife in the wild at bornfree.org.uk”. The chimpanzee looks sad and uncared for. In my opinion, the denotations of this image,conveyed by George Logan is to raise awareness of both homeless as well as the animals that are taken from captivity every day and brought into homes and cities, leading to animals suffering and becoming extinct. Again, grey tones are used to convey the severity of this subject and to set a sad and ‘down’ tone to the image.

This series of images produced by George Logan has really influenced me to experiment within Photoshop and improve on my editing technique. The level of skill that has gone into producing Logan’s images are really inspiring due to the quality of the images produced. I would like to incorporate some of these techniques into my work, in order to improve my confidence around using photoshop in this way as well as improving my technique.

Lee frost

I chose Lee frost because his images are so well framed and the colours within the images are astounding. I think that Lee has a very good eye for spotting the perfect locations for his images as well as getting the composition of the images spot on.

Images

I not only love the colours of this image, the blue tones of the ice and ocean contrasting the deep sky, but I also like how such a simple landscape can make such a powerful image. The isolated piece of ice could have been photographed in order to raise awareness for the current global warming situation that is occurring. with this in mind, the ice is juxtaposed by the great expanse of water behind it, which could have once been completely frozen, showing how serious the matter is.
this image was cleverly taken in order to make the water look soft and light, almost mist like. This then juxtaposes the harsh edged rocks, complemented with the soft sky. together, this photograph captures the eye instantly. The pure setting, accompanied by the soft clouds create a heavenly and angelic atmosphere. the pink sky also complements this as it is a sight that is rarely seen.

Lee Frost has influenced me to experiment with bringing out the colour within my images to really bring them to life. As my style is nature photography, I tend not to touch the colours very much, however, Frosts work has really showed me that altering the colours within your images, if done carefully, will not ruin your image but will actually bring out its full potential.

I would like to incorporate some of Lee’s techniques into my own photography because I think that this would improve my final images significantly.

Design a site like this with WordPress.com
Get started